
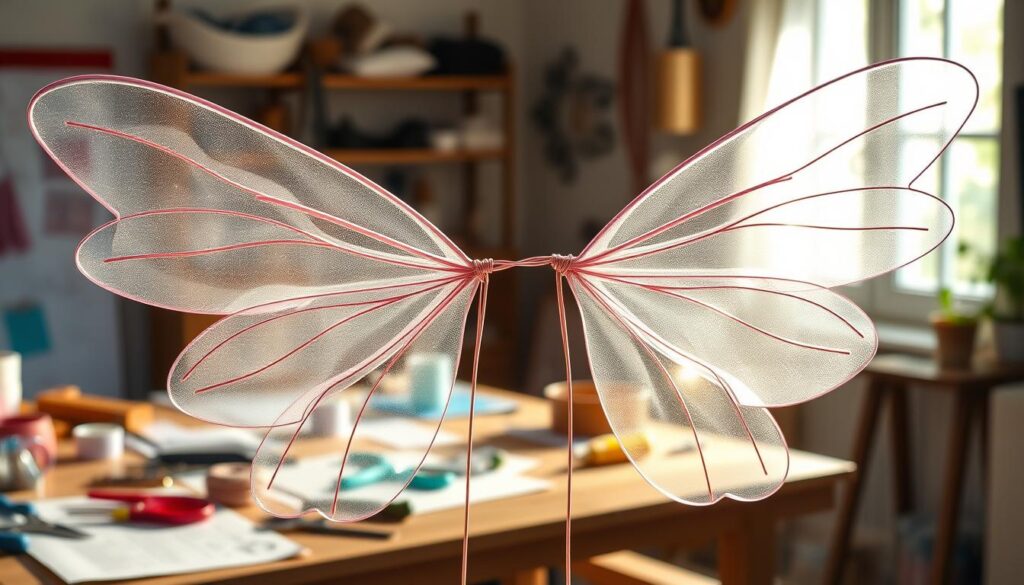
Imagine making your own custom, ethereal wings that seem to float. This guide shows you how to create your own stunning accessories. They’re perfect for costumes, photography, or just for fun.
This project is more than just making something pretty. It’s a chance to solve problems and show off your skills. With simple materials like wire and tights, you can make anything from butterflies to dragonflies.
We’ll take you through every step of the way. You’ll learn to make a strong frame, attach the fabric, and add special touches. We’ll also cover safety tips to make sure your wings are both beautiful and safe.
Let’s start this DIY project and turn simple supplies into wearable art.
Wing Anatomy & Shape Options
The look of your wings is key. Choosing between butterfly, fairy, moth, or dragonfly shapes sets the project’s path. This planning is vital. It turns your idea into a real plan for your wire fairy wings.
Each wing type has its own shape. This shape affects the frame’s structure and how you’ll cover it. Knowing these differences makes your final piece look real and feel right to wear.
Here is a breakdown of the four primary wing archetypes:
| Wing Type | Silhouette & Anatomy | Frame Shape Implication | Coverage Consideration |
|---|---|---|---|
| Butterfly | Two large, rounded lobes (forewings and hindwings). Often connected or closely paired. | Start with two large oval or circular shapes. These can be bent from a single continuous wire or two separate pieces. | Requires a seamless, smooth covering to mimic the classic wing surface. |
| Fairy | Delicate, multi-paneled, and often pointed. Can resemble elongated leaves or petals. | Think in sections. Create several smaller, tapered loops or distinct triangular points fanning out from a central spine. | Lends itself to layered or translucent materials for an ethereal, light-catching effect. |
| Dragonfly | Long, narrow, and membranous with a complex vein network. Two pairs of wings per side. | Focus on creating elongated, slender oval shapes. A central “spine” wire with perpendicular ribs is very effective. | Ideal for showing detailed veining patterns on top of a sheer base material. |
| Moth | Broader, with a “feathered” or furry appearance along the edges. Softer contours than butterflies. | Use broader, less defined oval shapes. Consider adding small, scalloped wire details along the outer edges for texture. | A textured or fringed covering can enhance the soft, feathered look. |
Your chosen silhouette guides how you bend the wire. A simple coat hanger or aluminum wire can be shaped into the foundational forms listed in the table. For a butterfly, bend a single wire into two large, connected ovals. For a fairy wing, fan several smaller loops away from each other to create those iconic pointed panels.
Adjusting these basic shapes creates different looks. Pulling sections of a circular bend into gentle points transforms it into a fairy wing. Compressing an oval makes it longer and more suitable for a dragonfly. This flexibility is the beauty of building with wire.
This step is about translation. Look at a reference picture of your desired insect or mythical creature. Break down its wings into simple wire forms—ovals, circles, triangles, and lines. Sketching this outline can be incredibly helpful.
With a clear shape in mind, you have a solid blueprint. This plan makes the next steps—bending the frame and choosing a covering method—much more straightforward. Your vision for stunning, lightweight wire fairy wings is now ready for construction.
Frame Bending Methods (Coat Hanger, Aluminum Wire)
Two main materials are used in DIY wing frames: coat hangers and aluminum wire. Your choice affects the project’s look and feel. A sturdy, symmetrical frame is key for wings that look magical and last long.
This section explains how to bend each material. You’ll learn to turn simple wires into a balanced wing skeleton.
The Coat Hanger Method: Upcycled and Accessible
This method is cheap and easy. Most homes have wire hangers. You need four identical ones.
Cut off the hooks with wire cutters. Wear safety glasses for this step.
Make each hanger straight. Then, bend them into your desired wing shapes. Ovals and teardrops are good for fairy wings. Circles work well for moth or dragonfly styles.
Pair the shapes. Overlap the ends of two wires for each wing half. Twist these ends together tightly. This makes the wing’s spine.
Wrap the twisted connection with strong tape. This secures the spine.
You now have two wing halves. Join them by overlapping the spine sections. Use tape to make a strong bridge. This is important for the wings to stay together.

For better control and a professional look, use aluminum craft wire. A 12-gauge wire is strong yet bendable. You can find it at most craft stores.
Unspool a long wire. Sketch your wing design on paper first. Then, bend the wire to match. Aluminum wire bends easily, allowing for detailed curves and sharp angles.
To make a continuous frame, bend one long wire into the shape. For bigger wings, you might need to join wires. Use epoxy or solder for a strong joint. Wrap the joint with floral tape before covering.
This makes a sleek, lightweight frame. It’s perfect for delicate coverings like sheer mesh.
Choosing Your Material: A Side-by-Side Guide
Your project goals help choose the best material. This table shows the main differences.
| Feature | Coat Hanger | Aluminum Wire (12-gauge) |
|---|---|---|
| Cost | Very Low (often free) | Moderate |
| Flexibility | Low; requires strong grip | High; easy to shape precisely |
| Durability | High; steel is very strong | Medium; can bend if mishandled |
| Finish | Functional, may have kinks | Smooth and professional |
| Best For | Quick projects, kids’ crafts, first attempts | Detailed designs, delicate coverings, cosplay |
Pro Tips for a Perfect Frame
These tips work for both materials.
- Achieve Symmetry: Bend both wing halves at the same time. Place them side-by-side on a flat surface and adjust constantly.
- Reinforce Joints: The tape on coat hanger wings can loosen. Apply multiple layers. For aluminum wire, epoxy is your best friend.
- Check Balance: Before adding any covering, find the frame’s balance point on your finger. It should sit evenly where the harness will attach.
- Test Strength: Gently flex the finished frame. It should spring back without deforming. Weak spots need more reinforcement.
Mastering these frame bending methods gives you complete creative freedom. For a detailed guide, check out this basic fairy wing construction guide. A solid frame is the first step toward a breathtaking final piece.
Once your frame is ready and symmetrical, you can move on to the fun part: choosing and applying the wing covering. The frame’s quality will make that next stage infinitely easier.
Covering Approaches: Tights, Cellophane, and Iridescent Film
Choosing the right skin for your wings can turn a simple wire frame into a magical accessory. This layer is key to the wings’ beauty and strength. There are three main ways to cover wings, each giving a unique look.
What you choose depends on the look you want and your crafting skills. We’ll look at the classic pantyhose wings method, a heat-activated cellophane process, and a professional mesh-and-film approach.
The Classic Tights Method
This easy method uses stretched nylon for a semi-opaque, skin-like base. It’s great for beginners and gives a soft, ethereal look.
Begin with a knee-high stocking or leg from cut-off tights. Stretch the material over one wire loop. Pull it tight to remove wrinkles, like a drum skin.
Secure the extra fabric at the back of the frame. Use floral wire or strong tape to hold it tight. Trim any leftover material for a clean finish.
Do this for all wing sections. The result is a durable, slightly stretchy covering. It takes paint and glitter well. This method is the base for many stunning pantyhose wings.
For a stiffer, shiny, and translucent effect, try heat-activated cellophane. This method creates panels that catch and bend light.
Cut cellophane sheets slightly larger than your wire shapes. Use an iron on a low, dry setting. Carefully apply heat over the cellophane where it overlaps the wire.
The heat will shrink and tighten the film, creating a smooth, drum-like surface. Warning: always use a pressing cloth to protect the material. This technique produces crisp, jewel-toned wings with a magical gleam.
Professional Mesh & Iridescent Film
For a high-end, light-catching finish, layer iridescent film over a supportive mesh. This gives a butterfly or dragonfly wing effect.
First, stretch a sheer mesh fabric (like tulle or bridal illusion) over the frame. Secure it as you would with tights. This mesh provides a stable base.
Then, cut sheets of adhesive iridescent film. Peel and carefully apply them to the mesh-covered panels. Smooth out any air bubbles.
The result is a multidimensional, holographic shimmer that changes with the light. It’s a show-stopping look for advanced creators.
Choosing Your Wing Skin
Your project’s goal should guide your material choice. Use this comparison to decide.
| Method | Best For | Final Look | Skill Level | Durability |
|---|---|---|---|---|
| Tights / Pantyhose | Beginners, soft looks, painting | Semi-opaque, matte, skin-like | Easy | High (flexible) |
| Cellophane + Heat | Translucent, shiny wings | Stiff, glossy, colored glass effect | Intermediate | Medium (can crack) |
| Mesh + Iridescent Film | Professional, light-catching designs | Holographic, multi-color shimmer | Advanced | Medium-High |
The classic tights method is a great starting point. It builds skills for more complex covers. Making pantyhose wings is a fun first step into costume crafting.
Each covering technique unlocks a different kind of magic. They let you tailor the wings to a specific character or event. The right covering can truly spark imagination for kids and adults alike.
Next, we will add color and detail to your winged canvas.
Paint, Shimmer, and Veining
Your project is now ready for a magical makeover. This is where lightweight wings get their sparkle and glow. The techniques you use depend on your material and the look you want.
Spray paint is great for big, sweeping colors. Spray it lightly and evenly to build up the color. It’s perfect for creating soft ombre effects, just like a butterfly wing.
For detailed patterns and realistic veining, use acrylic craft paints and fine brushes. Look at pictures of insect wings for inspiration. Paint the dark vein lines first, then blend the edges with a damp brush.
Pre-made iridescent film adds a magical shine. Apply it under a mesh or tights for a dramatic effect. It’s a quick and easy way to add sparkle, perfect for busy parents.
Special effect mediums add depth. Interference paints change color with the angle of view. Mix mica powders with clear glue for sparkly paste. Metallic highlights on veins make them stand out.
Adding glitter, sequins, or rhinestones is the final touch. Use clear glue to attach them along veins or edges. This turns your wings into a truly mesmerizing accessory.
Choosing the right medium is key for your desired look and material. The table below compares your main options.
| Medium | Best For | Application Tip | Drying Time |
|---|---|---|---|
| Spray Paint | Large gradients, solid base coats on wire/tights. | Work in a ventilated area. Use short bursts. | Fast (30-60 min) |
| Acrylic Craft Paint | Detailed veining, precise patterns, dot work. | Thin with water for washes. Use small brushes. | Medium (1-2 hours) |
| Interference / Iridescent Medium | Color-shift shimmer over a dark base color. | Mix into acrylic paint or apply in thin layers. | Medium (1-2 hours) |
| Loose Pigment / Mica Powder | Intense, metallic sparkle on specific areas. | Mix with clear glue or acrylic medium to form a paste. | Varies with binder |
Once your wings are dry, they’re ready to wear. Now, focus on making a harness that’s both secure and comfy.
Harness Systems (Elastic, Backpack, Bolero) + Balance/Weight
A harness system turns your art into wearable costume. Wings look great but are useless if they’re not comfy or stable. This part talks about making wings easy to wear, comparing different ways to attach them and the science of balance.
There are three main harness styles for light wings. Each has its own level of security, adjustability, and how it spreads out the weight.
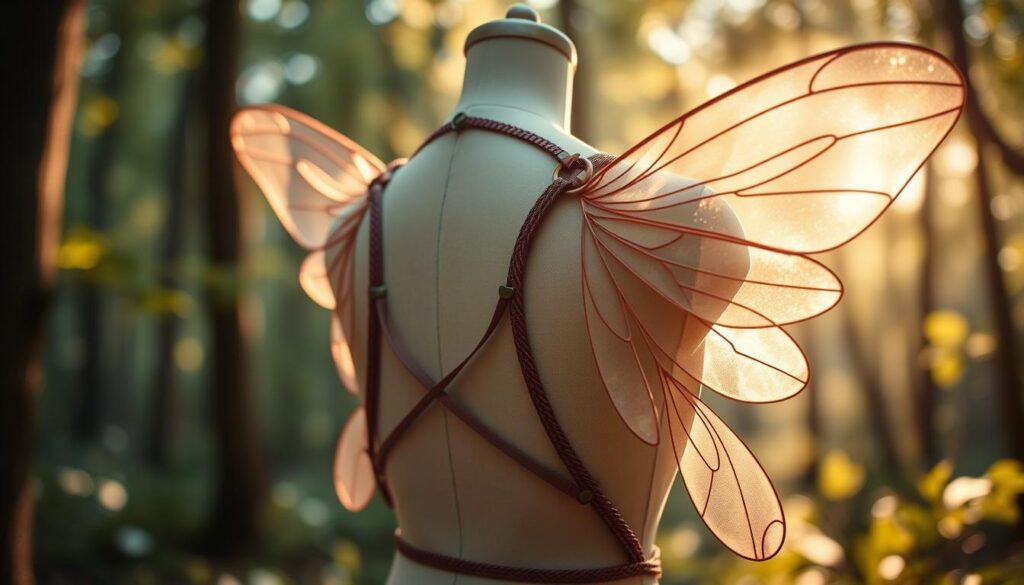
Elastic Bands are the quickest fix. Wide elastic loops can be sewn or glued to the wing’s spine. They fit over the shoulders like tank tops. They’re great for light wings or quick photo shoots. But, they don’t adjust well and can hurt shoulders over time.
Backpack-Style Straps offer great security and adjustability. You loop long ribbons around the wing’s center and tie them like backpack straps. This design spreads the weight evenly and keeps the wings in place, perfect for events or active kids.
Integrated Bolero Vests are the best for comfort. Wings attach to a light vest or bolero, spreading the weight across the shoulders and back. This is the most comfy for long wear and works well with slightly heavier wings. Adding felt or fabric to the attachment point makes it look neat and professional.
| Harness Type | Best For | Security Level | Comfort for Long Wear | Difficulty to Make |
|---|---|---|---|---|
| Elastic Bands | Very light wings, quick costumes | Low | Fair | Easy |
| Backpack Straps | Active wear, adjustable fit | High | Good | Moderate |
| Bolero Vest | Heavier frames, extended events | Very High | Excellent | Advanced |
Balance is key for comfy wings. The wings’ center of gravity should match the wearer’s, usually near the upper back. If the wings are too heavy, they’ll tip or pull.
To balance wings, add weight to the base or use a small counterweight. This can be a few ounces sewn into a pocket. It helps keep the wings stable.
Make sure attachment points are strong. Use Mod Podge on knots and fabric to make them last. Mod Podge dries clear and stiffens the area, preventing fraying.
Always test the fit and balance before adding decorations. The wearer should move and walk to see if the wings feel right. A good harness makes the wings feel like a natural part of the body.
Adding LEDs Safely
Adding lights to your wing needs careful planning for safety and fit. A good lighting system makes your wings shine at night. But, it must not harm the wing’s shape or feel uncomfortable to wear. This guide will show you how to safely add battery-powered LED lights or EL wire.
First, map out where you want the lights to shine. Often, it’s along the front edge or main veins. This helps wires and lights fit smoothly against the frame. They should follow the frame’s shape without stressing the elastic harness points.
Use clear tape, flexible glue, or small ties to keep wires in place. For a neat look, hide wires in seams where the wing meets the frame. Always wrap wire connections or battery packs with electrical tape or heat-shrink tubing. This keeps the wearer safe from short circuits.
Before wearing your lit wings, do these safety checks:
- Stick to battery-operated, low-voltage lights (usually 3-12V).
- Make sure batteries are in a safe case taped to the frame, not the elastic harness.
- Check that wires don’t hang loose or get caught.
- Test the whole circuit for 30 minutes to avoid overheating.
| Lighting Type | Best For | Power Source | Installation Notes |
|---|---|---|---|
| Micro-LED Strings | Detailed veining, dotted patterns | Small battery pack (AA/AAA) | Easily woven through mesh or tights. Wire is very flexible. |
| EL Wire | Solid, continuous lines of light | Inverter + battery pack | Stiffer; best glued along frame edges. Produces a hum. |
| LED Fairy Lights | Clustered sparkle effects | Button cell or USB pack | Lightweight. Often have a remote for color changes. |
Choose a power source that doesn’t get too hot. Small, enclosed battery packs work best. Attach them to the frame with strong tape or velcro. This makes the lights easy to remove for cleaning, battery swaps, or repairs.
A good lighting setup enhances your wing’s beauty and use. Place batteries and wires near the back for balance. By adding lights wisely, you make your wings more magical without losing their comfort.
Transport & Repair Kit
Your wings’ magic shouldn’t stop at your door. It’s important to have a good plan for transport and repairs. This way, they’ll arrive at your event looking great and can handle any small mishaps.
Don’t just throw your wings in a car. A long garment bag from a department store works well and is easy on your wallet. Put the wings in gently to avoid any damage. For extra safety, think about a custom case. A simple box with soft padding can fit your wings perfectly.
Even with the best plans, things can go wrong. Having a small repair kit with you can fix small problems right away. This keeps your wing looking amazing.
Keep your repair kit in a small bag. Being ready means you can fix a wire or add glitter quickly, without stress.
Your essential repair kit should have:
- Spare batteries for LED micro lights: Fading lights are a big problem. Carry extra batteries that match what your lights need.
- Matching paint and glitter: Small bottles of paint and a tiny glitter container can fix small damage.
- A segment of extra wire: The same type of wire as your frame helps with quick fixes or strengthening weak spots.
- Fabric glue and clear tape: Use fabric glue for lasting repairs on tights or mesh. Clear tape is great for quick fixes.
Being proactive makes you a confident caretaker of your art. You can enjoy the event, knowing you’re ready for anything.
Kid & Event Safety (Crowd Space, Eco Glitter)
Making magical wings is a joy. But making sure they are safe is key. For kids’ wings, use soft, flexible wire. Make sure all straps are secure but won’t choke.
Always watch over kids when they wear wings. This is very important. Also, think about where you’ll wear them. Big wings at crowded places need extra care.
Practice moving in your wings to get used to them. Use a harness that keeps the wings close to your body. This stops them from bumping into things.
Be careful with your decorations too. Regular glitter is bad for the environment and can hurt skin. Look for eco-friendly glitter instead.
Biodegradable glitter is a good choice. It’s made from plants and doesn’t harm the earth. You can also use glitter gels or cellophane for a safe, shiny look.
Your fairy wings should bring joy, not worry. By picking safe materials and eco-friendly glitter, you create a magical experience. It’s fun and good for the planet.